Enjoy 5% OFF + FREE shipping on orders $49+! Use Code: 202512AK5

RayNeo Air 4 Pro Prescription Lenses: Compatibility Guide and Buying Checklist
- ANNKUTVR Team
If you are researching RayNeo Air 4 Pro prescription lenses, you are probably trying to answer a few practical questions before you buy: Will they fit correctly? Will they improve visual clarity? And what should you check before ordering?
This guide is designed to answer those questions first.
Instead of pushing you straight to a product page, this article walks through the real decision points: model compatibility, prescription details, fit and alignment, installation basics, and the most common reasons some users still notice blur or discomfort after adding inserts. If you want a cleaner and more comfortable viewing experience on the RayNeo Air 4 Pro, this is the page to read before placing an order.
If you are still comparing RayNeo models or want to choose the right insert before checking out, start with our RayNeo prescription lenses guide. It gives you a model-by-model overview for RayNeo Air 4 Pro, Air 2s, Air 3s, and Air 3s Pro lens inserts.
Quick Facts
- RayNeo Air 4 Pro is designed to work with prescription lens inserts.
- RayNeo provides a separate official purchase path for prescription lenses.
- The official supported range is myopia 0 to -10.00D and astigmatism 0 to -2.00D.
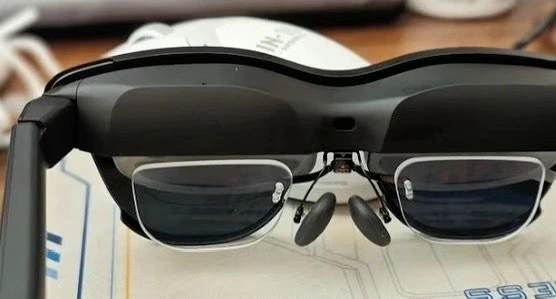
- Prescription inserts attach through the dedicated frame and nose pad area.
- Buyers should verify the exact model name, prescription details, and insert fit before ordering.
In This Guide
Does RayNeo Air 4 Pro Support Prescription Lenses?
Yes. RayNeo Air 4 Pro is built as a prescription-ready AR glasses model, which means users who need vision correction can use prescription lens inserts instead of forcing their everyday glasses into the device.
However, “supports prescription lenses” does not mean every insert on the market will behave the same way.
This is where many buyers get confused. Some product listings use broad language like “RayNeo Air compatible” or “Air-series compatible,” but that wording alone is not enough. Before ordering, you should confirm that the insert is intended for RayNeo Air 4 Pro, not just a loosely grouped older Air-series accessory.
For reference, you can review the official RayNeo prescription lens purchase information and RayNeo Air 4 Pro product details.
Prescription inserts are usually the better option for four types of users.
Nearsighted users who want cleaner viewing
If you already wear glasses in daily life, you may be able to use RayNeo Air 4 Pro with your regular glasses for short sessions. But for many users, that setup becomes less comfortable over time and makes it harder to maintain a stable visual sweet spot.
Users with astigmatism
Astigmatism can make near-eye displays feel less stable when alignment is even slightly off. A properly made prescription insert does not solve every comfort issue on its own, but it removes one major source of visual inconsistency.
Long-session users
If you watch movies, game, or work for extended periods inside AR glasses, dedicated inserts are often the more practical choice. What feels “good enough” for ten minutes can feel very different after an hour.
Users who want a simpler daily setup
Prescription inserts make the overall routine easier. You do not have to manage two layers of eyewear, keep adjusting your glasses under the headset, or deal with extra facial pressure every time you use the device.
What to Check Before You Buy RayNeo Air 4 Pro Prescription Lenses
This is the most important section of the guide.

1. Confirm the exact model name
Do not assume “RayNeo Air 4” and “RayNeo Air 4 Pro” are always treated as identical search terms in product listings. Buyers often shorten names while searching, and sellers often group several models on one page. That is normal in e-commerce, but you should still verify the exact supported model list before buying. Check for:
RayNeo Air 4 Pro clearly listed by name
A compatibility section, not just a generic page title
Photos or installation examples that match the current insert design
A support response or FAQ if multiple models are listed on one page
2. Verify your prescription details
Before ordering custom inserts, make sure you have the correct prescription information from your optometrist or your latest prescription sheet. At minimum, most buyers should double-check:
SPH (sphere)
CYL (cylinder, if you have astigmatism)
AXIS (if CYL is present)
PD (pupillary distance), if required by the seller Do not guess these values. Even a good insert cannot compensate for incorrect prescription data.
3. Check the supported prescription range
This is where many users skip too quickly. According to RayNeo’s official prescription lens page, the supported range is:
Myopia: 0 to -10.00D
Astigmatism: 0 to -2.00D You can verify that on the official RayNeo prescription lens purchase page.
4. Check fit and alignment design
Two inserts may both claim compatibility, yet still feel very different in actual use. What matters most is not marketing language. It is whether the insert mounts securely, sits correctly, and remains stable during use. Ask these questions:
Does the insert attach securely?
Is the installation method clearly explained?
Is the structure rigid enough to avoid wobble?
Is the insert shown installed on the target device?
Does it arrive pre-assembled or as separate parts?
5. Decide whether you want pre-assembled or DIY inserts
Some lens systems arrive as loose lenses and a separate frame. Others arrive fully assembled and ready to install. A pre-assembled setup is usually better if you want:
Less setup time
Fewer installation mistakes
A cleaner out-of-box experience
Faster daily use
Once compatibility is confirmed, the next major comparison point is lens configuration. Look for details like:
High-index lens options
Anti-reflective or anti-glare coating
Blue-light filtering, if relevant to your use case
Scratch resistance
Material durability
One of the most frustrating situations is when the insert attaches, but the image still does not feel fully right. That does not always mean the insert is defective. It usually means one of several factors still needs to be checked.

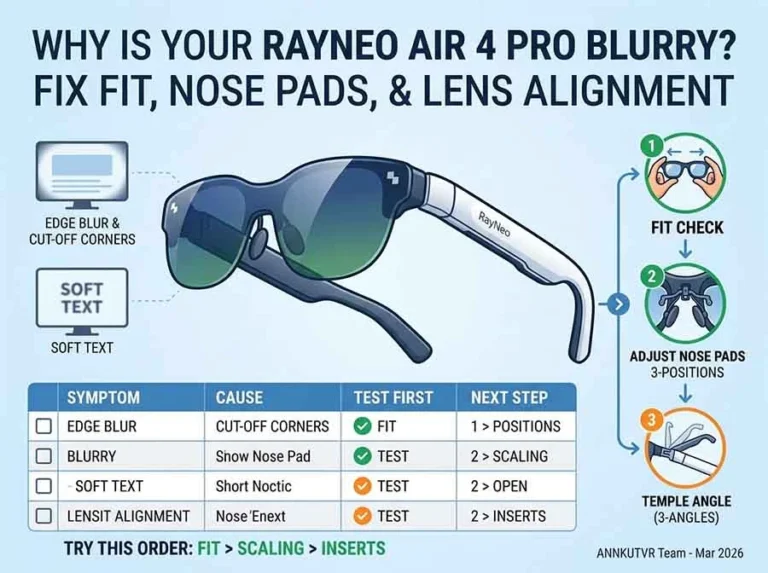
1. Fit and position are slightly off
Near-eye displays are sensitive to small changes in position. If the device sits a bit too high, too low, or too far from your eyes, clarity can change across the visible image.
This is why some users report acceptable center clarity but softer edges or corners.
Before blaming the insert itself, check:
- Nose pad position
- Temple angle
- How evenly the device sits on your face
- Whether the insert is fully seated and stable
This is a common workaround, but not always a comfortable one. RayNeo’s own smart glasses prescription guide explains that wearing regular glasses under smart glasses can reduce eye box, increase the risk of scratches, and add pressure on the nose. You can review that explanation in the official smart glasses prescription lens guide.
3. Prescription details may need to be rechecked
If the fit seems correct and the insert appears secure, the next thing to verify is the prescription itself.
This is especially important if:
- Your prescription is old
- Your PD was estimated
- Your astigmatism values are stronger than average
- One eye feels noticeably clearer than the other
4. The insert may not be the best match for the device
Sometimes a product is broadly described as compatible, but the actual experience depends on more than whether it physically attaches. Alignment, stability, and real-use fit still matter.
How RayNeo Air 4 Pro Prescription Lenses Are Installed
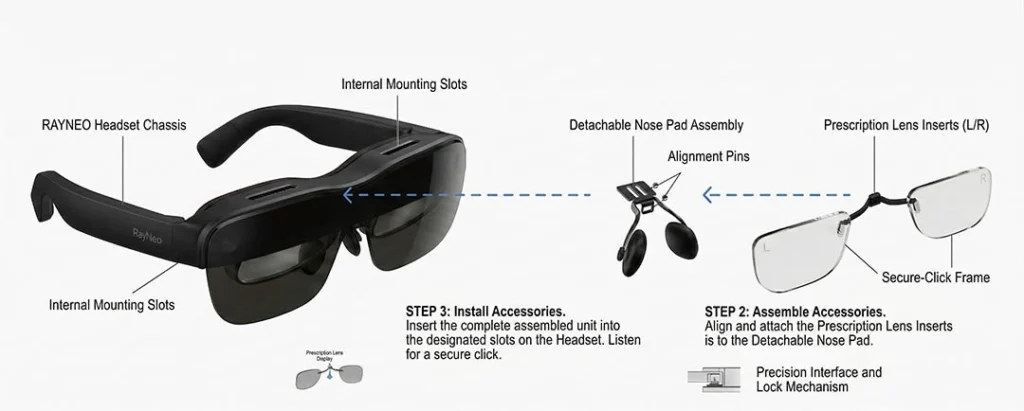
Installation should be simple. If it feels overly complicated, that is often a sign you are dealing with the wrong format or an unnecessarily awkward insert system. RayNeo’s official installation page explains that the prescription lenses frame is attached to the nose pad area. You can review the official RayNeo prescription lens installation guide.
A typical workflow looks like this:
1. Identify the insert orientation
2. Align it with the correct mounting area
3. Press gently and evenly into place
4. Confirm the insert feels secure
5. Put on the device and check visual alignment
Prescription Lenses vs Wearing Glasses with RayNeo Air 4 Pro
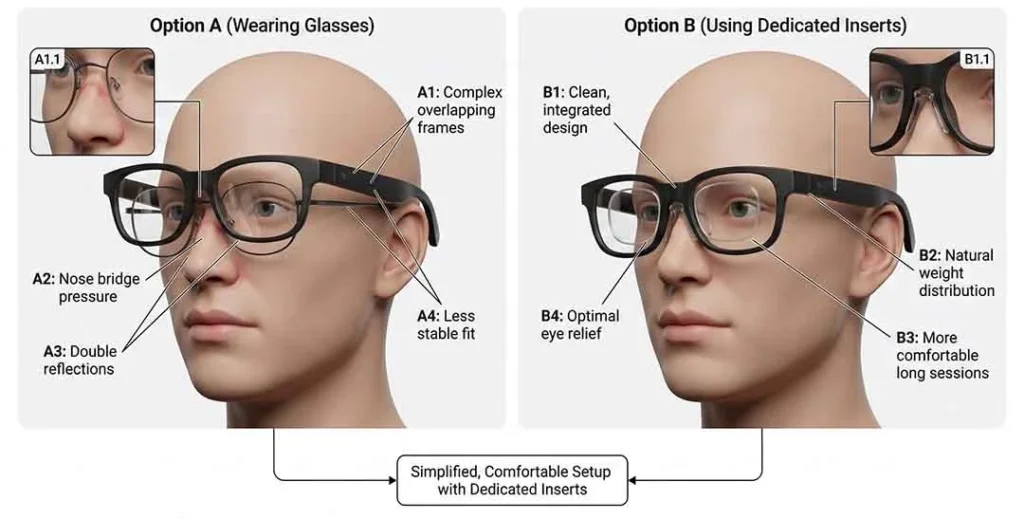
Wearing glasses under AR glasses
Pros:
- No separate purchase if you already own glasses
- Works as a temporary solution for short testing
Cons:
- More pressure on the nose and face
- Less stable fit
- Greater chance of discomfort in long sessions
- Harder to maintain a consistent visual sweet spot
- More risk of lens contact or scratches
Using prescription inserts
Pros:
- Cleaner daily setup
- Better comfort for long sessions
- Less bulk
- More natural fit
- Easier repeat use
Cons:
- Requires a separate purchase
- Requires accurate prescription details
- Requires model verification before ordering
How to Choose the Right RayNeo Air 4 Pro Prescription Insert
By this point, the real question is no longer “Do I need prescription lenses?” It is “Which type of setup fits the way I actually use the device?”
A strong buying decision usually comes down to these five points:
Choose a model-specific option
Avoid vague listings whenever possible. Clear compatibility is better than generic wording.
Choose a setup that matches your tolerance for assembly
If you do not want to handle screws, loose parts, or extra setup, pre-assembled inserts are usually the simpler route.
Choose a seller that explains the product clearly
A strong product page should answer questions about compatibility, installation, coating, prescription input, shipping, and support without making you guess.
Choose comfort over short-term convenience
Wearing regular glasses under the device may feel like a shortcut, but for many users it becomes a comfort problem later.
Choose a product page that makes the next step simple
Once you have confirmed model compatibility and gathered your prescription details, ordering should feel straightforward.
FAQ
Does RayNeo Air 4 Pro support prescription lenses?
Yes. RayNeo Air 4 Pro is designed to work with prescription inserts, but buyers should still verify model compatibility and prescription support before ordering.
What prescription range is officially supported?
According to RayNeo’s official purchase page, the supported range is myopia 0 to -10.00D and astigmatism 0 to -2.00D.
Can I wear RayNeo Air 4 Pro over my regular glasses?
Some users do, but it is usually less comfortable and less streamlined than using dedicated prescription inserts, especially for longer sessions.
Why does RayNeo Air 4 Pro look blurry at the edges?
Blur can come from fit, insert alignment, viewing position, incorrect prescription data, or the way the device sits on your face.
How do I install prescription lenses for RayNeo Air 4 Pro?
A typical insert is aligned with the correct mounting area and attached at the frame or nose pad section. Check the official installation page or your seller’s step-by-step guide before forcing anything into place.
Are all RayNeo Air-series prescription inserts interchangeable?
Do not assume that. Always verify the exact supported model list before ordering. Check whether the insert is specifically described for RayNeo Air 4 Pro.
Final Thoughts
RayNeo Air 4 Pro prescription lenses are not difficult to buy once you know what to check. Most mistakes happen before checkout: ordering from a vague compatibility page, guessing prescription details, or assuming every insert labeled “Air compatible” will behave the same way.
If you want the safest path, focus on these four things:
Confirm the exact model
Verify your prescription details
Choose a stable insert format
Prioritize comfort and fit, not just price
That is the difference between an insert that merely attaches and one that actually improves the way RayNeo Air 4 Pro feels in everyday use.